Batteries are not all created equal. Depending on your specific needs, you may require a different type of battery. In this guide, we will explore deep cycle batteries in depth, understanding their functions and uses. We will also delve into the differences between lead-acid and lithium deep cycle batteries.
Deep Cycle Batteries vs Starter Batteries
Starter batteries are designed for short bursts of high power, mainly used to start up engines and then run on gasoline. They are not meant to be discharged extensively and doing so can harm their performance and lifespan. Deep cycle batteries, on the other hand, are marathon runners that provide a consistent supply of power over a longer period. They are used to run vehicles instead of gasoline. Dual-purpose batteries combine both starting and cycling capabilities, making them a convenient option for certain applications.
Deep Cycle Battery Discharge Capability
Deep cycle batteries can safely discharge a significant portion of their stored energy. The discharge capability varies depending on the battery, with some able to handle discharging up to 100% of their reserves. It is essential to check the manufacturer’s recommendation for your specific battery.
Uses of Deep Cycle Batteries
Deep cycle batteries are utilized in various applications that require continuous power for extended periods. Some common uses include electric golf carts, floor cleaning machines, scissor lifts, wheelchairs, scooters, forklifts, recreational vehicles, trolling motors on boats, navigational devices on boats, and renewable energy systems.
Types of Deep Cycle Batteries
There are several types of deep cycle batteries, each with its own advantages and disadvantages. The main types are flooded lead-acid batteries, gel and AGM batteries (valve regulated lead-acid or VRLA), and lithium-ion batteries.
1. Flooded Lead-Acid Batteries: The oldest type still in use, these batteries require regular maintenance, including adding water and cleaning acid residue. They are heavy and not as popular due to their maintenance requirements.
2. Gel and AGM Batteries: These lead-acid batteries do not have free-flowing liquid electrolytes and require no water addition. They eliminate spillage and corrosion issues, making them popular for marine and RV applications. However, they are more expensive and may not last as long as flooded batteries.
3. Lithium-Ion Batteries: Lithium batteries offer numerous advantages, including no maintenance requirements, deeper discharge capabilities, and faster charging. Although they have a higher upfront cost, their longer lifespan and other benefits make them a worthwhile investment in the long run.
Deep Cycle Battery Capacity
Lithium batteries have a higher capacity compared to lead-acid batteries, thanks to their chemistry. They can provide up to 100% of their rated capacity regardless of the discharge rate. In contrast, lead-acid batteries provide less usable energy at higher discharge rates. Lithium batteries also perform better in colder weather, with minimal capacity loss compared to lead-acid batteries.
Lifespan of Deep Cycle Batteries
The lifespan of a deep cycle battery depends on various factors. Lead-acid batteries are more susceptible to abuse, requiring proper maintenance and charging practices to maximize their lifespan. Improper watering, over-discharging, over-charging, and under-charging can significantly reduce the lifespan of a lead-acid battery. On the other hand, lithium batteries are less affected by these factors, but they can be damaged by severe over-discharging or charging at high currents in freezing temperatures. Additionally, high temperatures can degrade the lifespan of any battery.
FAQs
How do I know what size deep cycle battery I need?
To determine the size of a deep cycle battery, consider several factors. Understand your power requirements and calculate the total energy consumption. Evaluate battery types (flooded, AGM, or gel) and their advantages and disadvantages. Take into account the battery’s capacity, reserve capacity, size, depth of discharge, and charging requirements. Consider budget, brand reputation, customer reviews, and environmental impact. By considering these factors, you can choose the perfect deep cycle battery that meets your requirements and delivers reliable power for years to come.
Understand Power Requirements: Calculate the total energy consumption and evaluate the power demands of the devices or equipment that will be using the battery.
Consider Capacity and Reserve Capacity: Assess the battery’s ampere-hours (AH) capacity and reserve capacity (RC) to ensure it can handle your power requirements and unexpected situations.
Size and Dimensions: Check the battery’s dimensions and compare them to the available space in your application to ensure a proper fit.
Depth of Discharge (DOD): Understand the specified DOD of the battery and avoid discharging it beyond its recommended level to preserve its lifespan.
Charging and Maintenance: Follow proper charging and maintenance guidelines to ensure the longevity of the battery and invest in a high-quality battery charger.
Budget and Brand Reputation: Consider the overall value and performance of the battery rather than solely focusing on the initial cost. Research reputable brands and read customer reviews for reliable products and customer support.
Environmental Impact: If environmental impact is a concern, look for batteries designed with eco-friendly materials and recyclability.
What not to do with a deep cycle battery?
To maximize the life of your deep cycle battery, avoid discharging it beyond 80% to ensure optimal performance and longevity. Using a deep cycle battery to start a boat is not recommended as it can greatly decrease the battery’s lifespan. Differentiate between deep cycle batteries and car batteries, understand the amp-hour rating, and be aware that the lifespan of a deep cycle battery is typically three years with proper maintenance. Lastly, marine batteries can be hybrid deep cycle and starting batteries, but they are not as efficient as separate batteries.
Avoid Over-Discharging: Do not discharge a deep cycle battery beyond 80% to prevent damage and prolong its lifespan.
Do Not Use for Starting: Using a deep cycle battery to start a boat is not recommended as it can significantly decrease the battery’s lifespan.
Differentiate from Car Batteries: Understand the differences between deep cycle batteries and car batteries, as they are designed for different purposes and have different discharge characteristics.
Amp-Hour Rating: Consider the amp-hour rating of a deep cycle battery, which indicates its capacity to deliver a certain amount of current over a specific period.
Lifespan: The typical lifespan of a deep cycle battery is around three years with proper maintenance and charging practices.
Marine Batteries: Be aware that marine batteries can be hybrid deep cycle and starting batteries, but they are not as efficient as using separate batteries for each purpose.
What is a downside of using deep cycle batteries?
Deep cycle batteries offer many benefits but also come with some drawbacks. They have a shorter lifespan compared to other battery types, require regular maintenance, and come with a higher upfront cost. They also have limited capacity and power output. However, it ultimately depends on your specific needs whether these disadvantages outweigh the advantages. A thorough consideration of your requirements will help determine if a deep-cycle battery is right for you!
Shorter Lifespan: Deep cycle batteries typically have a shorter lifespan compared to other battery types, lasting around 2-5 years depending on usage and maintenance. This may require more frequent replacements, which can be inconvenient and costly.
Higher Upfront Cost: Deep cycle batteries tend to have a higher upfront cost compared to regular lead-acid or automotive batteries. However, this cost reflects their quality, performance, and longer-lasting power.
Regular Maintenance: Deep cycle batteries require regular maintenance to ensure optimal performance. Proper charging and discharging cycles, checking electrolyte levels, and cleaning terminals are necessary to prevent damage and maintain capacity.
Limited Capacity and Power Output: Deep cycle batteries are designed to provide sustained energy over extended periods, but they have limited capacity and power output. They may not be suitable for high-power applications or devices that require quick bursts of energy.
Is it better to charge a deep cycle battery slow or fast?
When charging a deep cycle battery, it is advisable to charge it slowly to prevent damage. Trickle charging, which is a slow and continuous charging method, is generally ineffective for deep cycle batteries due to their lower discharge rate. Charging the battery too quickly using conventional methods can permanently damage the battery. It is important to avoid overcharging, which can lead to potential damage. Additionally, it is recommended to charge the battery outdoors or in a well-ventilated space to ensure safety and prevent the accumulation of fumes.
Trickle Charging: Trickle charging, a slow and continuous charging method, is generally ineffective for deep cycle batteries due to their lower discharge rate. It may not effectively maintain the battery’s charge level.
Charging Speed: Charging the battery too quickly using conventional methods can permanently damage the deep cycle battery. It is advisable to charge the battery slowly to prevent overcharging and potential damage.
Safety Considerations: Charging a deep cycle battery indoors can pose safety concerns. The battery may produce fumes that can accumulate and cause breathing issues. It is recommended to charge the battery outdoors or in a well-ventilated space to ensure safety and prevent hazardous situations.
1. What is the difference between a deep cycle battery and a starter battery?
Deep cycle batteries provide power for longer periods, while starter batteries supply high power for short bursts to start engines.
2. Can deep cycle batteries handle deep discharge?
Yes, deep cycle batteries are designed to handle deeper discharges compared to starter batteries.
3. What are the common uses of deep cycle batteries?
Deep cycle batteries are used in electric vehicles, recreational vehicles, boats, golf carts, and renewable energy systems.
4. What are the different types of deep cycle batteries?
The main types are flooded lead-acid batteries, gel and AGM batteries (VRLA), and lithium-ion batteries.
5. Do deep cycle batteries require maintenance?
Flooded lead-acid batteries require regular maintenance, while gel, AGM, and lithium-ion batteries are maintenance-free.
6. How long do deep cycle batteries last?
The lifespan depends on various factors such as battery type, usage patterns, and maintenance practices. It is best to consult the manufacturer’s specifications for an estimated lifespan.
7. Are lithium batteries worth the higher upfront cost?
Despite the higher initial investment, lithium batteries offer longer lifespans, faster charging, and deeper discharge capabilities, making them a cost-effective choice in the long run.
8. Can lithium batteries be used in all applications that require deep cycle batteries?
Yes, lithium batteries can be used in most applications where deep cycle batteries are required, offering superior performance and longevity.
9. How do deep cycle battery capacities differ between lead-acid and lithium batteries?
Lithium batteries have a higher capacity and can provide their rated capacity regardless of the discharge rate, while lead-acid batteries offer less usable energy at higher discharge rates.
10. Can deep cycle batteries be used in extreme temperatures?
Extreme temperatures, both hot and cold, can affect battery performance and lifespan. Lithium batteries generally perform better in extreme temperatures compared to lead-acid batteries, which may experience reduced capacity in colder conditions.
Converting your RV to lithium batteries can significantly enhance your power system’s efficiency, longevity, and overall performance. By making this switch, you can enjoy longer-lasting power supplies that charge faster and require less maintenance than traditional lead-acid batteries.
What are the benefits of switching to lithium batteries in an RV?
Lithium batteries provide numerous advantages over lead-acid options, including extended lifespans (up to 10 years), higher energy density allowing for more power storage in less space, and faster charging capabilities that enable quicker replenishment of power reserves while on the road or at a campsite.Chart: Comparison of Battery Types
Feature
Lead-Acid Batteries
Lithium Batteries
Lifespan
3-5 years
10+ years
Depth of Discharge
50%
Up to 80%
Weight
Heavier
Lighter
Charging Speed
Slower
Faster
How do you choose the right lithium batteries for your RV?
Selecting the appropriate lithium battery involves assessing your RV’s energy needs based on appliances used, desired runtime, and available space for installation. Ensure that the chosen battery fits within your existing setup while meeting voltage requirements.
What safety precautions should be taken during installation?
Before beginning installation, wear protective gear such as gloves and safety glasses. Ensure adequate ventilation in the battery compartment to prevent overheating during operation. Securely mount the battery using appropriate trays or brackets to prevent movement while traveling.Chart: Safety Precautions Checklist
Safety Measure
Description
Protective Gear
Gloves and safety glasses
Ventilation
Ensure airflow around battery
Secure Mounting
Use trays or brackets
How do you properly wire and connect lithium batteries in an RV?
To wire your new lithium battery:
Disconnect power sources from existing systems.
Install a battery isolation switch to prevent over-discharging.
Connect positive terminals first, followed by negative terminals according to manufacturer instructions.
Ensure all connections are tight to avoid voltage drops.
What is a Battery Management System, and why is it important?
A Battery Management System (BMS) monitors battery health by tracking parameters like voltage, temperature, and current flow. It ensures safe charging and discharging practices while preventing overcharging or overheating, which can lead to damage or safety hazards.
How do you test and maintain lithium batteries after installation?
Post-installation testing involves checking voltage output and charging capabilities regularly. Establish a maintenance schedule that includes cleaning terminals, inspecting connections for corrosion, and monitoring overall battery health to prolong lifespan.
What considerations should be made before converting to lithium batteries?
Before making the switch:
Assess compatibility with existing chargers and converters.
Consider initial costs versus long-term savings.
Evaluate any necessary modifications required for successful integration into your RV’s electrical system.
How do lithium batteries compare to lead-acid batteries in terms of performance?
In terms of performance, lithium batteries outperform lead-acid counterparts with longer life cycles, greater depth of discharge capabilities, lighter weight, consistent voltage output during discharge cycles, and faster charging times—making them ideal for modern RV use.
What are the environmental impacts of lithium battery disposal?
Lithium batteries must be disposed of responsibly due to their chemical composition; improper disposal can lead to environmental contamination. Recycling programs exist that safely process these materials, so always check local regulations regarding disposal methods.
How do lithium batteries perform in extreme temperatures?
Lithium batteries generally perform well across a range of temperatures; however, extreme cold can reduce their efficiency temporarily while high temperatures can accelerate degradation processes. It’s advisable to store them within recommended temperature ranges when not in use.
Expert Views
“Switching from lead-acid to lithium batteries transforms your RV experience by enhancing efficiency while reducing weight—a crucial factor when traveling on diverse terrains. However, proper installation practices cannot be overstated; they ensure safety and longevity.”
FAQ Section
Can I install lithium batteries myself?
Yes, but ensure you follow all safety guidelines and consult professionals if unsure about any steps.
How much does it cost to convert my RV to lithium?
Costs vary based on battery type and capacity but expect an initial investment that pays off over time due to longevity.
Will my existing charger work with new lithium batteries?
You may need a compatible charger designed specifically for lithium technology; check specifications before proceeding with installation.
Sailing boats require reliable power for long periods of time, and lithium batteries provide a solution for their extensive power needs. This article explores the many advantages of using lithium batteries for sailing boats.
Advantages of sailing lithium batteries:
1. Lightweight: Lithium batteries are typically half the weight of lead-acid batteries, improving performance and agility on the water.
2. Fast charging: Compared with lead-acid batteries, the charging speed of lithium batteries is much faster, and it can be fully charged within an hour at the fastest.
3. Tolerate partial state of charge: Partial state of charge will not harm the health or long-term performance of lithium batteries.
4. Increase usable capacity: Lithium batteries have 25-50% higher capacity than lead-acid batteries, which can provide power for longer periods of time without voltage dips.
5. Temperature resistance: Lithium batteries perform well over a wide temperature range, are 2.5 times more efficient than lead-acid batteries at low temperatures, and can operate safely at temperatures up to 149°F (65°C).
6. Maintenance-free: Lithium batteries do not require any maintenance, saving time and energy for boat owners.
7. Long service life: The service life of lithium batteries is 10 times longer than that of lead-acid batteries, which reduces the frequency of replacement and saves costs.
Sailor’s positive experience with lithium batteries:
Sailing Nandji and Gone with the Wynns are two examples of sailors who have upgraded to RELiON lithium batteries and share their positive experiences.
Lithium sailboat battery options:
Redway offers a wide range of lithium sailboat batteries with specific functions and capacities to meet the requirements of different sailboats.
Frequently asked questions and answers about sailing lithium batteries:
1. The service life of lithium battery: the service life of lithium battery is 10 times longer than that of lead-acid battery.
2. Safety of lithium batteries: Lithium batteries have built-in safety features, such as battery management systems (BMS), to prevent overcharging, overheating, and other potential problems.
3. Compatibility with lead-acid batteries: In most cases, lithium batteries can be replaced without major modifications, but it is recommended to consult a professional.
4. Performance at extreme temperatures: Compared with lead-acid batteries, lithium batteries are temperature-resistant and more efficient at low temperatures.
5. Charging time of lithium battery: The charging speed of lithium battery is significantly faster than that of lead-acid battery, and it can be fully charged in one hour at the fastest.
6. Compatibility with existing charging systems: In most cases, existing charging systems can be used, but compatibility with lithium battery chemistry and voltage requirements should be ensured.
7. Maintenance of lithium battery: Lithium battery is maintenance-free and does not require regular inspection or equalization charging.
8. Compatible with existing marine electronic equipment: Lithium batteries can be used with existing marine electronic equipment to provide stable and reliable power.
9. Lithium battery discharge: Lithium batteries can be fully discharged without any damage to their health or long-term performance.
10. Environmental protection of lithium batteries: Lithium batteries are more environmentally friendly, have less impact on the environment, can be recycled, and do not contain toxic substances such as lead and acid.
FAQs
Are lithium batteries better for boats?
Lithium batteries offer several advantages over lead-acid batteries for boats. They can withstand more discharge-charge cycles, provide a higher usable capacity, maintain a consistent voltage, accept higher charging currents, and weigh significantly less. However, the higher initial cost of lithium batteries should be considered. With their longer service life and improved performance, lithium batteries are a valuable choice for boaters looking for reliable and efficient power solutions.
What is the problem with lithium batteries on boats?
Lithium batteries on boats can present risks and challenges that need to be addressed for safe operation. One of the main concerns is the potential for thermal runaway, which can lead to overheating, flammable electrolytes, gas leakage, sparks, flames, and even explosions. Environmental impact, safety concerns related to shocks and overcharging, and the risk of theft are also important considerations. To optimize electric boat performance, choosing the right lithium battery and charger is crucial, taking into account the boat’s primary usage and regulatory requirements.
Thermal Runaway: Prolonged overheating of lithium batteries can lead to thermal runaway, resulting in flammable electrolytes, gas leakage, sparks, flames, and even explosions.
Environmental Impact: Lithium batteries present challenges in terms of their environmental impact, requiring proper handling and disposal to minimize their ecological footprint.
Safety Concerns: Shocks and overcharging can compromise battery safety, emphasizing the need for proper precautions and monitoring systems. The market value of lithium batteries also makes them attractive to thieves, necessitating security measures.
Choosing the Right Battery and Charger: Selecting the appropriate lithium battery and charger is crucial for optimizing electric boat performance. Consider the boat’s primary usage, regulatory requirements, and match the battery and charger accordingly.
Are lithium batteries safe on sailboats?
Lithium batteries are safe on sailboats when used and maintained correctly. While there have been instances of fire hazards associated with lithium-ion batteries in smaller devices, such as e-cigarettes, it’s important to note that not all lithium batteries are the same. When high-quality lithium batteries designed for marine applications are used, and proper safety measures are followed, the risk of fire or other safety hazards is significantly reduced. Lithium batteries offer advantages such as a longer lifespan, better performance, lighter weight, and higher usable capacity, making them a safe and reliable choice for sailboats.
Importance of Quality: When using lithium batteries on sailboats, it is crucial to choose high-quality batteries specifically designed for marine applications. These batteries undergo rigorous testing and meet safety standards to reduce the risk of fire hazards.
Correct Usage and Maintenance: Proper handling and maintenance of lithium batteries are essential for safe operation on sailboats. Following manufacturer guidelines and safety measures, such as avoiding overcharging and using authorized chargers, helps minimize risks.
Advantages of Lithium Batteries: Compared to traditional lead-acid batteries, lithium batteries offer numerous advantages, including a longer lifespan, better performance, lighter weight, and higher usable capacity. These benefits make them a reliable and efficient power solution for sailboats.
What is the advantage of a lithium battery over a regular battery?
Lithium batteries offer many advantages over regular batteries. They are lightweight and powerful, making them suitable for various applications. With extremely low self-discharge rates, lithium batteries can provide consistent power even after extended periods of non-use. They have a longer lifespan, high energy density, and the ability to charge quickly. Additionally, lithium batteries require minimal maintenance compared to regular batteries. These advantages make lithium batteries the preferred choice for mobile power systems, solar energy, portable devices, electric cars, and RVs/boats.
Lightweight and Powerful: Lithium batteries are significantly lighter than regular batteries, making them ideal for applications where weight is a concern. Despite their compact size, they deliver powerful performance.
Low Self-Discharge Rate: Lithium batteries have an extremely low self-discharge rate, allowing them to retain a high percentage of their rated capacity even after extended periods of non-use. This ensures a constant power supply when needed.
Longer Lifespan: Lithium batteries have a longer lifespan compared to regular batteries. They can be charged and discharged hundreds of times before reaching their cycle life, providing reliable power over an extended period.
High Energy Density: Lithium batteries offer high energy density, meaning they can store a significant amount of power in a compact package. This makes them suitable for portable devices like smartphones and tablets, as well as electric cars that require sustained power over long periods.
Fast Charging: Lithium batteries have the capability to charge quickly, allowing for shorter charging times compared to regular batteries. This is particularly beneficial for devices that need power over extended periods, such as portable electronics or electric vehicles.
Low Maintenance: Lithium batteries require minimal maintenance compared to regular batteries. They do not need regular water additions or extensive battery chargers, resulting in reduced electricity bills and freeing up space in warehouses.
Wide Range of Applications: Lithium batteries find applications in various fields, including mobile power systems, solar energy, portable devices, electric cars, and RVs/boats. Their superior performance and reliability make them a preferred choice in these industries.
Harnessing solar energy effectively is critical in our pursuit of sustainable and renewable energy solutions. One essential factor in optimizing solar power systems is the elevation angle. This article delves into the importance of the elevation angle in solar energy, its fundamental principles, the factors affecting it, and its various applications. By comprehensively understanding the elevation angle, we can maximize the efficiency of solar energy systems and significantly enhance their performance.
What is Solar Energy?
Solar energy, a cornerstone of renewable energy sources, is derived from the sun’s rays. It is an abundant, clean, and sustainable resource that plays a pivotal role in reducing our dependency on fossil fuels. Solar energy systems capture sunlight and convert it into electricity through photovoltaic (PV) cells. These systems can be installed on rooftops for residential use or deployed as large-scale solar farms for commercial and industrial applications. By leveraging solar energy, we can mitigate environmental impact and contribute to a greener future.
Importance of Understanding the Elevation Angle
The elevation angle, also known as the tilt angle, is the angle between the solar panel and the horizontal plane. It is crucial for optimizing the capture of sunlight, as it influences the amount of solar radiation received by the panels. Proper adjustment of the elevation angle ensures that solar panels receive maximum sunlight exposure throughout the day, thereby enhancing electricity production.
Key Points:
Maximizes Sunlight Capture: Correctly setting the elevation angle allows solar panels to absorb the maximum amount of sunlight.
Enhances Efficiency: Optimal tilt improves the overall efficiency of the solar power system.
Facilitates Strategic Planning: Understanding the elevation angle aids in the precise design and positioning of solar projects.
Basics of the Elevation Angle
Definition and Calculation
The elevation angle is determined based on the geographical location, time of year, and specific energy needs. A general rule of thumb is to set the elevation angle equal to the latitude of the location to maximize annual energy production. However, adjustments may be necessary depending on seasonal variations.
Seasonal Adjustments
Winter: The sun is lower in the sky; hence, a higher elevation angle is recommended.
Summer: The sun is higher; thus, a lower elevation angle is preferable.
Factors Affecting the Elevation Angle
Several factors influence the ideal elevation angle for solar panels:
Geographic Location
The optimal elevation angle varies significantly with latitude. Locations closer to the equator experience higher solar angles, while regions further from the equator require different tilts to maximize sunlight capture.
Seasonal Variations
Seasonal changes necessitate adjustments in the elevation angle to ensure optimal performance throughout the year. Different angles are required to capture the varying path of the sun across the sky during different seasons.
Weather Conditions
Local weather patterns, such as cloud cover and atmospheric conditions, impact the effectiveness of the elevation angle. Cloudier regions might benefit from slightly adjusted angles compared to sunnier areas.
Applications of Elevation Angle in Solar Energy Systems
Residential and Commercial Solar Panels
For both residential and commercial solar panel installations, the elevation angle is vital in maximizing energy output. By adjusting the tilt according to geographic location and seasonal changes, solar panels can generate more electricity efficiently.
Concentrated Solar Power Systems
In concentrated solar power (CSP) systems, tracking mirrors reflect sunlight onto a central receiver. The elevation angle plays a crucial role in positioning these mirrors accurately to ensure maximum sunlight exposure, thereby enhancing energy production.
Off-Grid Applications
Off-grid solar applications, such as solar water heaters and small-scale PV systems, also benefit from the correct elevation angle. Proper orientation based on the elevation angle ensures efficient sunlight harnessing, leading to significant energy generation and cost savings.
Maximizing Solar Energy Efficiency with the Right Elevation Angle
Optimizing the elevation angle is paramount for achieving peak performance in solar energy systems. By understanding and implementing the correct tilt, we can significantly enhance energy capture and system efficiency.
Key Strategies:
Regular Adjustments: Regularly adjusting the elevation angle according to seasonal changes ensures continuous optimal performance.
Precision in Design: Accurate calculations and design considerations based on location and environmental factors contribute to higher efficiency.
Utilizing Technology: Advanced tracking systems can dynamically adjust the elevation angle, further optimizing energy capture.
Conclusion
Understanding the elevation angle is fundamental in maximizing the efficiency of solar energy systems. By grasping its basics, considering influencing factors, and applying this knowledge, we can optimize solar energy capture and enhance overall system performance. Proper adjustment and strategic implementation of the elevation angle contribute significantly to our goal of sustainable energy and a greener future. Let us continue to explore innovative ways to leverage solar energy effectively, reducing our environmental impact and fostering a sustainable world.
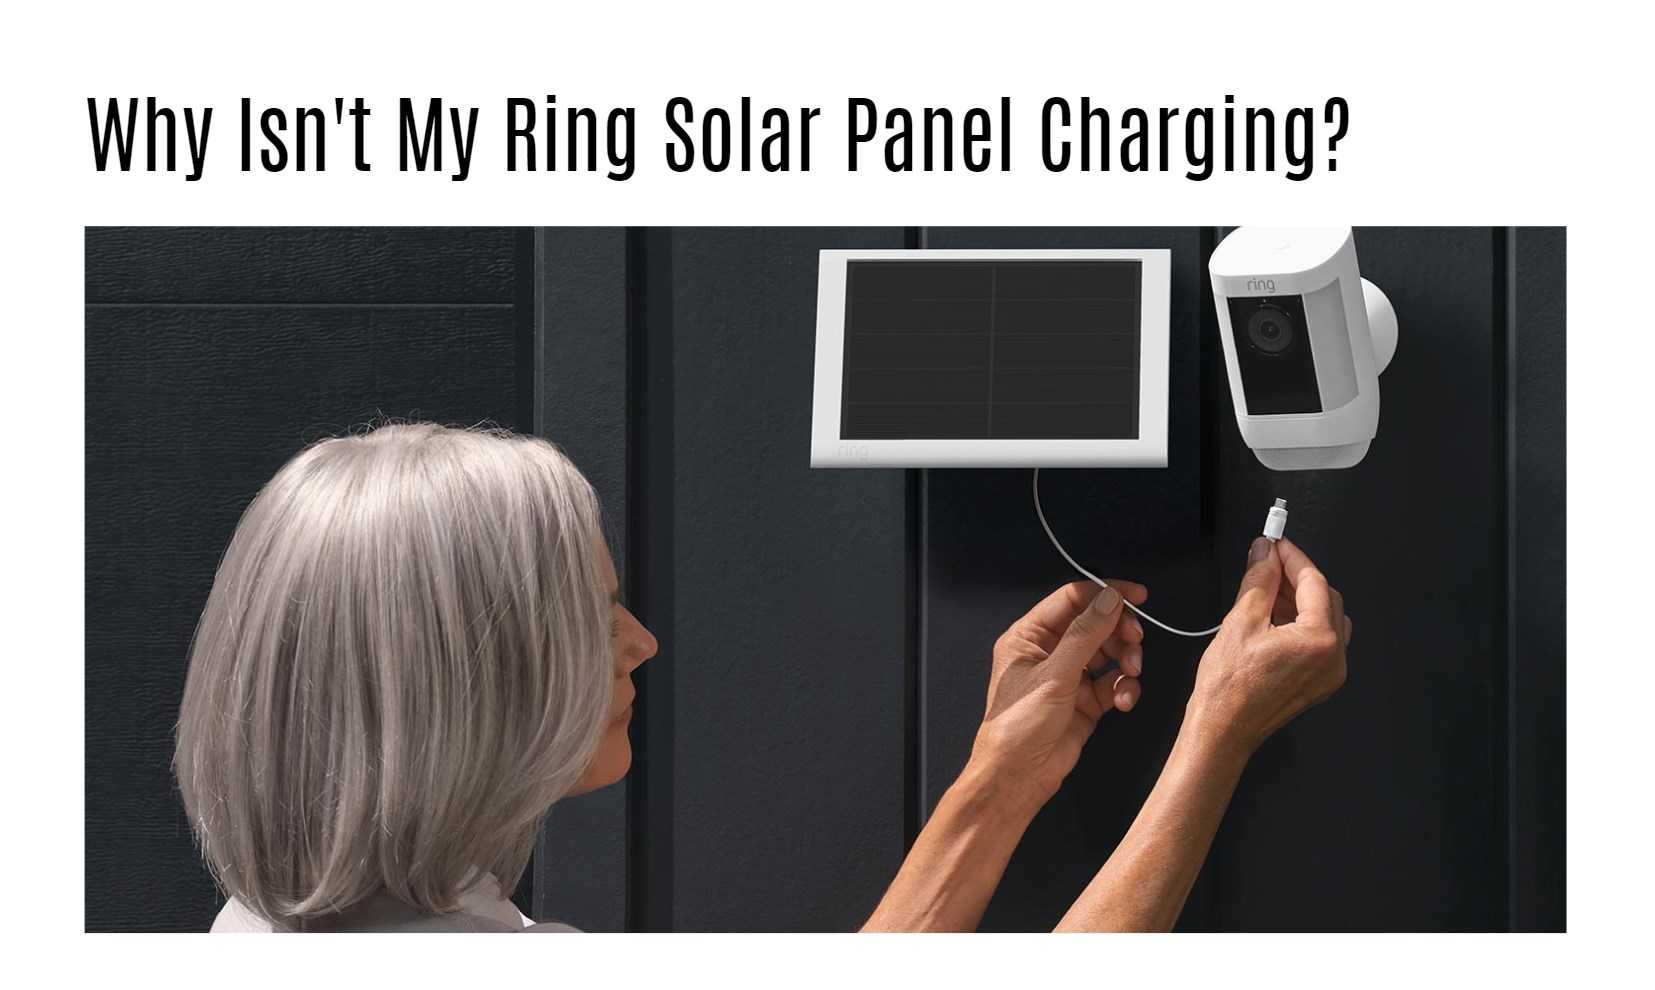
Common reasons for a Ring solar panel not charging include a mismatch between the panel and the device, dirt accumulation on the panel’s surface, or insufficient sunlight exposure. Ensuring compatibility, regular cleaning, and optimal placement can address these concerns and help restore proper charging functionality.
Mismatch between Solar Panel and Device: Compatibility is key when it comes to solar panel charging. A mismatch between the solar panel and the Ring camera can hinder the charging process. Ensure that the solar panel is compatible with your specific Ring camera model to ensure seamless charging functionality.
Dirt Accumulation on the Panel: Over time, dust, debris, or dirt can accumulate on the surface of the solar panel, reducing its efficiency. Regular cleaning of the panel’s surface is essential to maintain optimal charging performance. Gently wipe away any dirt or debris using a soft cloth or sponge to ensure maximum sunlight absorption.
Insufficient Sunlight Exposure: The effectiveness of a solar panel relies on adequate sunlight exposure. If the solar panel is placed in a shaded area or obstructed by objects, it may not receive sufficient sunlight to generate the necessary energy for charging. Ensure proper placement of the solar panel in a location that receives ample sunlight throughout the day.
Common Reasons Why Solar Panels Aren’t Charging
Solar panels may not be charging due to insufficient sunlight exposure, technical faults in the solar system, or faulty panels. Ensuring proper sunlight exposure, addressing technical issues, and monitoring panel health can help resolve charging problems.
Insufficient Sunlight Exposure: One of the primary reasons for solar panel charging issues is insufficient sunlight exposure. If the panels are shaded by trees, buildings, or other obstructions, they may not receive enough sunlight to generate the necessary power. Regularly assess the panel’s placement and ensure it is positioned to receive maximum sunlight throughout the day.
Technical Faults in the Solar System: Technical faults within the solar system can disrupt the charging process. Wiring issues, malfunctioning solar charge controllers, or problems with the inverter can prevent the panels from effectively charging the batteries. Conduct regular system checks and seek professional assistance to identify and resolve any technical faults.
Faulty Solar Panels: Over time, solar panels can develop faults, such as damaged cells or connections. These faults can hinder the charging process and reduce the overall efficiency of the panels. Regular maintenance and inspections are essential to identify and address any issues with the panels promptly.
Check for Obstructions or Damage
Check for Obstructions or Damage for Solar Panel not Charging: To troubleshoot solar panels not charging, inspect them for obvious signs of damage, such as cracks or loose connections. Additionally, check for obstructions that may cast shadows on the panels and reduce their performance. Clear any obstructions and clean the panels to ensure optimal sunlight absorption.
Look for Obvious Signs of Damage: Begin by inspecting the solar panels for any visible signs of damage, such as cracks, loose connections, or physical defects. These issues can disrupt the flow of electricity and prevent the panels from effectively converting sunlight into energy. If any damage is detected, it is important to address it promptly to restore the panels’ functionality.
Check for Obstructions: Next, examine the area surrounding the solar panels for any obstructions that may cast shadows or block sunlight. Even partial shading can significantly impact the panels’ performance. Trees, buildings, or other objects that obstruct sunlight should be trimmed or repositioned to ensure maximum exposure to sunlight throughout the day.
Clean the Panels: Dirt, debris, or shading on the surface of the solar panels can reduce their efficiency and hinder the charging process. Regular cleaning is crucial to maintain optimal sunlight absorption. Use a soft cloth or sponge to gently remove any dirt or debris from the panel’s surface. Additionally, ensure that there is no shading caused by leaves, branches, or other objects.
Ensure Proper Placement and Direction
Ensure Proper Placement and Direction for Solar Panel not Charging: To maximize solar panel charging, ensure proper placement and direction. In the northern hemisphere, panels should face true south, while in the southern hemisphere, they should face true north. Avoid obstructions that cast shadows and consider tilting the panels between 15 and 40 degrees for optimal performance.
Best Orientation for Solar Panels: In the northern hemisphere, the ideal orientation for solar panels is facing true south. This allows the panels to receive maximum sunlight exposure throughout the day. Conversely, in the southern hemisphere, panels should face true north to optimize sunlight absorption. Aligning the panels correctly based on the hemisphere ensures optimal energy generation.
Maximize Sunlight Exposure: To ensure proper placement, it is crucial to consider any potential obstructions that may cast shadows on the solar panels. Trees, buildings, or other objects that obstruct sunlight should be taken into account when positioning the panels. By avoiding shading, you can maximize sunlight exposure and enhance the charging efficiency of the panels.
Tilt Angle Optimization: While the direction is important, the tilt angle of the solar panels also plays a significant role. Experts suggest tilting the panels between 15 and 40 degrees, depending on the location and climate. This tilt angle allows for better sunlight absorption and energy generation, especially in areas with varying seasons or climates.
Review Power Source and Connection
Review Power Source and Connection for Solar Panel not Charging: To troubleshoot solar panels not charging, review the power source and connection. Check the solar charger for proper voltage output, inspect the solar charge controller for any faults, and review the wiring and connections for any loose or faulty connections.
Check the Solar Charger: Start by checking the solar charger to ensure it is functioning properly. Measure the voltage output of the charger to verify that it is delivering the expected power to charge the batteries. If the voltage is below the required level, there may be an issue with the charger that needs to be addressed.
Inspect the Solar Charge Controller: The solar charge controller plays a crucial role in regulating the charging process. Inspect the controller for any faults or malfunctions that may be preventing the panels from charging effectively. Look for error codes or warning indicators that can provide insights into the controller’s condition.
Review Wiring and Connections: Examine the wiring and connections between the solar panels, charge controller, and batteries. Loose or faulty connections can disrupt the flow of electricity and hinder the charging process. Ensure that all connections are secure and properly tightened. If any wiring issues are detected, they should be addressed promptly.
Troubleshooting Tips for Specific Models of Ring Solar Panel
Troubleshooting Tips for Specific Models of Ring Solar Panel not Charging: If your Ring Solar Panel is not charging, try these steps: provide enough sunlight, check compatibility, inspect for defects, verify wire connections, reboot the connected device, check battery level, reinstall the solar panel, and contact the support team for assistance.
Provide Enough Sunlight: Ensure that the Ring Solar Panel receives sufficient sunlight exposure throughout the day. Check for any obstructions or shadows that may hinder the charging process. Placing the panel in an area with maximum sunlight can optimize its performance.
Check the Solar Panel Compatibility: Verify that the specific model of Ring Solar Panel you are using is compatible with your Ring device. Not all models are compatible with every Ring device, so it is important to ensure a proper match for seamless charging.
Inspect for Defects: Carefully examine the solar panel for any visible defects or damage. Look for cracks, loose connections, or any other issues that may affect its performance. If any defects are found, consider contacting the manufacturer for further assistance.
Verify Wire Connections: Check the wires connecting the solar panel to the Ring device. Ensure that they are securely connected and free from any damage or corrosion. Loose or damaged wires can disrupt the charging process and should be addressed promptly.
Reboot the Connected Device: Try rebooting the Ring device connected to the solar panel. Sometimes, connectivity issues can be resolved by simply rebooting the device. This can help establish a fresh connection and restore proper charging.
Check Battery Level: Verify the battery level of your Ring device. If the battery is low, it may not charge effectively even with a functioning solar panel. Recharge or replace the battery if necessary to ensure optimal charging performance.
Reinstall the Solar Panel: If all else fails, consider reinstalling the Ring Solar Panel. Disconnect and reconnect the panel, ensuring a secure and proper connection. This can help troubleshoot any potential issues with the initial installation.
Contact the Support Team: If the troubleshooting steps do not resolve the issue, it is recommended to reach out to the Ring support team for further assistance. They can provide specific guidance and troubleshooting tailored to your situation, ensuring a prompt resolution to the charging issue.
Contacting Ring Customer Support
If you’ve tried troubleshooting your Ring Solar Panel and it still isn’t charging, don’t fret. Contacting Ring Customer Support can provide you with the assistance you need to get your solar panel up and running efficiently.
Ring’s customer support team is well-equipped to handle any technical issues or questions you may have about your solar panel. They can offer personalized guidance based on the specific model you own, ensuring that you receive accurate and tailored solutions.
To reach out to Ring Customer Support, visit their website or give them a call. Be prepared to provide details about your solar panel, such as its model number and any troubleshooting steps you’ve already taken. This information will help the support team diagnose the issue more effectively.
By contacting Ring Customer Support, you’re taking proactive steps towards resolving any charging issues with your solar panel swiftly and effectively. Don’t hesitate to reach out for expert assistance whenever needed – they are there to help!
Conclusion
Ensuring that your Ring Solar Panel is charging properly is essential for keeping your Ring devices powered and functioning effectively. By following the troubleshooting tips provided in this guide, you can quickly identify and resolve any issues preventing your solar panel from charging.
Remember to regularly check for obstructions or damage, confirm proper placement and direction for optimal sunlight exposure, and review the power source and connections. If you encounter specific problems with certain models of Ring Solar Panels, refer to the troubleshooting tips tailored to those devices.
If all else fails, don’t hesitate to reach out to Ring’s customer support for further assistance. With a little diligence and some expert guidance when needed, you’ll have your Ring Solar Panel up and running efficiently in no time. Keep those batteries charged, keep your home secure – happy monitoring!
FAQs
How can I adjust my Motion Sensitivity and Motion Frequency to optimize battery life for Ring devices?
You can adjust the motion sensitivity and motion frequency. To do this, tap the menu, select the device, access motion settings, and adjust the motion frequency to a less frequent setting. By reducing sensitivity and frequency, you can optimize battery life by minimizing false alerts and reducing the number of motion events recorded.
Adjusting Motion Sensitivity: By reducing the motion sensitivity, you can minimize false motion alerts triggered by irrelevant movements, such as swaying trees or passing cars. This helps conserve battery power by avoiding unnecessary activations.
Optimizing Motion Frequency: Another way to optimize battery life is by adjusting the motion frequency to a less frequent setting. This reduces the number of motion events recorded, preserving battery power for longer periods. Selecting a less frequent motion frequency setting can strike a balance between capturing important events and conserving battery life.
Step-by-Step Instructions: To adjust the motion sensitivity and motion frequency, follow these steps: a. Tap the menu (≡) on the top left of the Dashboard. b. Select the device you want to adjust. c. Access the Motion Settings. d. Navigate to Advanced Settings. e. Tap on Motion Frequency. f. Choose a less frequent setting, such as “Frequently,” “Regularly,” or “Periodically.” g. Save the changes in the upper right corner.
How do cloudy weather and snow affect the performance of Ring solar devices?
Cloudy weather conditions mean less direct sunshine, which significantly lessens the ability of solar panels to generate power. Snow can further obstruct sunlight, reducing the efficiency of solar panels. However, despite these challenges, solar panels can still produce energy on cloudy and snowy days, albeit at a lower efficiency compared to sunny days.
Cloudy Weather: Cloudy weather conditions result in reduced direct sunshine, which significantly decreases the power generation capacity of solar panels. With less sunlight available, the efficiency of solar panels is compromised, leading to a decrease in energy production.
Snow Coverage: Snow can pose an additional challenge for solar panels. When snow covers the surface of the panels, it obstructs the sunlight from reaching the photovoltaic cells. This obstruction reduces the efficiency of the solar panels and limits their ability to generate electricity.
Energy Production on Cloudy and Snowy Days: Despite the challenges posed by cloudy weather and snow, solar panels can still produce energy on such days. While the energy production may be lower compared to sunny days, solar panels can capture diffuse sunlight and convert it into usable electricity. This allows for some level of energy generation even in less optimal weather conditions.
How do I recharge the battery, hardwire Ring devices, and troubleshoot power issues?
To recharge the battery, use a USB cable and monitor if it drains again. For hardwired devices showing low battery, check the voltage received and ensure the power source is working properly. Troubleshooting steps may involve refreshing the Ring app, checking Wi-Fi connection, and seeking expert solutions for specific issues.
Recharging the Battery: To recharge the battery of Ring devices, connect the device using a USB cable and monitor if it drains again. This ensures that the battery is replenished and ready for optimal performance.
Hardwiring Ring Devices: If your Ring device is hardwired but showing a low battery, it’s important to check the voltage received by the device. Open the Ring app, select the device, and navigate to Device Health to verify the voltage. Additionally, ensure that the power source is functioning properly to provide sufficient power to the device.
Troubleshooting Power Issues: When encountering power-related issues with Ring devices, there are several troubleshooting steps you can take. Start by refreshing the Ring app to ensure accurate battery level readings. Check your Wi-Fi connection to ensure a stable connection between the device and the Ring app. If the issue persists, consider seeking expert solutions or contacting Ring support for further assistance.
How do I use the Ring app and understand its feature settings?
The Ring app allows you to manage your Ring devices and access their feature settings. Simply tap the menu icon to access the side menu and navigate the main screen. Customize motion detection settings by defining motion zones and adjusting sensitivity levels. The Ring app offers a user-friendly interface for seamless control and monitoring of your Ring devices.
Accessing the Side Menu: To begin, tap the menu icon located in the upper-left hand corner of the app. This action opens the side menu, where you can find various features and settings.
Navigating the Main Screen: From any section within the app, you can easily return to the main screen by tapping the menu icon again. This allows for seamless navigation and quick access to different functionalities.
Customizing Motion Detection: One of the key features of the Ring app is the ability to customize motion detection settings. By accessing the app’s settings, you can define specific motion zones, adjust sensitivity levels, and fine-tune other parameters to ensure accurate motion detection tailored to your needs.
Exploring Feature Settings: The Ring app offers a range of feature settings to enhance your experience. These settings may include options for video quality, audio settings, notification preferences, and more. Take some time to explore and customize these settings to optimize your Ring device usage.
How do I subscribe to a Ring Protect Plan?
To subscribe, log in to your Ring account from a web browser and navigate to the Protect Plan tab. Select the Unsubscribed Devices option to view eligible devices. Choose the subscription plan that suits your needs and follow the on-screen instructions to complete the process. Enjoy the enhanced features and benefits of a Ring Protect Plan.
Log in to Your Ring Account: Start by logging in to your Ring account from a web browser. This will provide access to the necessary settings and subscription options.
Navigate to the Protect Plan Tab: Once logged in, navigate to the Protect Plan tab or a similar section where subscription options are available. This is where you can explore the different plans and choose the one that suits your needs.
Choose the Subscription Plan: Within the Protect Plan tab, you will typically find the Unsubscribed Devices or a similar option. Select this option to view the devices that are eligible for subscription. From there, choose the subscription plan that aligns with your requirements.
Complete the Subscription Process: Follow the on-screen instructions to complete the subscription process. This may involve providing payment details and confirming your subscription. Once completed, your Ring devices will have access to the enhanced features and benefits provided by the Ring Protect Plan.
How can I improve the wifi connection for my Ring devices?
Consider installing a mesh network for better wifi coverage, especially in larger homes. Reduce obstructions and optimize the placement of your wifi router to ensure a strong and stable connection. Disconnect any unused devices from your network to free up bandwidth. Enjoy a reliable wifi connection for seamless operation of your Ring devices.
Install a Mesh Network: If you have a larger home or areas with weak wifi coverage, consider installing a mesh network. Mesh networks utilize multiple units strategically placed throughout your home to provide better wifi coverage. This helps eliminate dead zones and ensures a strong and stable connection for your Ring devices.
Reduce Obstructions: Take a look around your home and identify any obstructions that may interfere with the wifi signal. Objects like furniture, appliances, or walls can block or weaken the signal. By rearranging or removing these obstructions, you can improve the wifi coverage and signal strength for your Ring devices.
Optimize Router Placement: The placement of your wifi router plays a crucial role in the strength and reach of the wifi signal. Position your router in a central location within your home, away from large metal objects or dense walls that can obstruct the signal. This helps ensure that the wifi signal reaches all areas where you have Ring devices installed.
Disconnect Unused Devices: Having multiple devices connected to your wifi network can put a strain on the bandwidth and affect the overall performance. Disconnect any devices that are not actively being used to free up bandwidth and optimize the wifi connection for your Ring devices.
What types of help resources are available for Ring devices?
Ring offers a comprehensive support system to assist users. The official Ring Help website provides a wealth of articles, FAQs, and troubleshooting guides. If you need personalized assistance, you can contact the customer support team. Additionally, Ring has partnered with organizations like NNEDV to offer device donation programs and resources for eligible organizations.
Ring Help Website: The official Ring support website serves as a hub for all your support needs. It offers a comprehensive range of help articles, FAQs, and troubleshooting guides. Whether you need assistance with device setup, installation, customization, or troubleshooting, the Ring Help website provides valuable resources to guide you through the process.
Contacting Customer Support: If you encounter any specific issues or require personalized assistance, you can reach out to Ring’s customer support team. They are available to address your concerns, provide guidance, and offer solutions to ensure that your Ring devices are functioning optimally.
Partnerships and Programs: Ring has also established partnerships with organizations like NNEDV, which focus on important causes such as domestic violence prevention and community safety. Through these partnerships, Ring offers device donation programs and additional resources to eligible organizations, further extending support and assistance to those in need.
Solar energy has become increasingly popular as a sustainable and renewable energy source. Solar panels, which convert sunlight into electricity, are central to this technology. However, there are many questions about the feasibility of using solar panels without batteries. This guide will delve into the practicality of a battery-free solar system, outlining the necessary components, benefits, and common concerns.
Understanding Solar Energy Systems
Key Components of a Solar Energy System
A complete solar energy system includes several critical components:
Solar Panels: These devices consist of photovoltaic cells that convert sunlight into direct current (DC) electricity.
Inverters: These convert the DC electricity generated by the solar panels into alternating current (AC) electricity, which is suitable for household use.
Racking Systems: These are used to mount the solar panels securely on rooftops or other structures.
Batteries (Optional): These store excess electricity generated during the day for use during times when solar production is low.
Types of Batteries in Solar Systems
While batteries are not mandatory, they can enhance the efficiency and reliability of solar systems. Various types of batteries are used, each with distinct advantages:
Lithium-Ion Batteries: Known for high efficiency and energy density.
Lead-Acid Batteries: Praised for their recyclability and cost-effectiveness.
Nickel-Cadmium Batteries: Require low maintenance and have a long lifespan.
Sodium Nickel Chloride Batteries: Offer high energy density and safety.
Using Solar Panels Without Batteries
Grid-Tied Solar Systems
It is entirely possible to operate solar panels without batteries by using a grid-tied system. In this setup, the solar panels generate electricity during the day. Any excess energy produced is sent back to the grid. During periods of low solar production, such as early mornings, evenings, or cloudy days, power is drawn from the grid.
Advantages of Grid-Tied Systems
Cost Savings: Eliminates the need for expensive battery storage.
Net Metering: Excess energy sent to the grid can earn credits to offset electricity bills.
Simple Maintenance: Fewer components mean less maintenance.
Practical Applications
A 5kW solar system without a battery is ideal for locations with monthly electricity bills ranging from ₹5,000 to ₹10,000 during peak seasons. This setup is especially useful in areas with reliable grid infrastructure.
Benefits of Incorporating Battery Storage
While using solar panels without batteries is feasible, adding batteries can provide significant benefits:
Energy Storage: Excess energy generated during the day can be stored and used later, reducing reliance on the grid.
Backup Power: Batteries provide a backup power source during outages, ensuring continuous electricity supply.
Reduced Carbon Footprint: Storing and using solar energy more effectively can decrease your overall environmental impact.
Energy Independence: Batteries can help achieve greater energy independence, especially in areas with unstable grid supply.
Frequently Asked Questions
1. Can I use solar panels without batteries?
Yes, you can use solar panels without batteries by relying on a grid-tied system to ensure continuous power supply during periods of low solar production.
2. What are the main components of a solar energy system?
The main components are solar panels, inverters, racking systems, and optionally, batteries.
3. What types of batteries are used in solar panels?
Common types include lithium-ion, lead-acid, nickel-cadmium, and sodium nickel chloride batteries.
4. Can I use solar panels and inverters without battery storage?
Yes, but you will need to rely on the grid for power during periods of low solar production.
5. Why are batteries necessary for off-grid PV systems?
Batteries ensure voltage and frequency stability and store energy for use when solar production is low.
6. Can a grid-tied or hybrid inverter be used without a DC to DC converter?
No, because these inverters require a stable voltage reference, which is provided by the DC to DC converter.
7. What are the benefits of solar battery storage?
Solar battery storage allows for storing excess electricity, provides backup power during outages, reduces your carbon footprint, and ensures electricity availability after sunset.
8. What happens with excess generated energy in a solar panel system without a battery?
Without a battery, excess energy is typically sent back to the grid, where it can earn credits through net metering systems.
9. Where can a 5kW solar system without a battery be used?
It is suitable for locations with monthly electricity bills ranging from ₹5,000 to ₹10,000 during the summer.
10. What are the pros and cons of using a solar panel directly without a battery?
Pros: Cost savings on batteries, ability to power small and medium loads during blackouts. Cons: Inability to power loads at night, lack of backup power on cloudy days, and limitations on load power demands compared to solar panel generation.
Conclusion
Using solar panels without batteries is a practical and cost-effective option for harnessing solar energy. By implementing a grid-tied system, you can ensure a consistent power supply and make efficient use of excess energy through net metering. However, incorporating battery storage can provide additional benefits such as energy independence, backup power, and a reduced carbon footprint. Evaluate your specific energy needs and consult with professionals to determine the best setup for your solar panel system.
Solar panels play a crucial role in harnessing solar energy and converting it into electricity. In this article, we will explore the amps produced by a 100-watt solar panel and provide easy-to-understand information supported by data. Additionally, we will answer the top 10 questions that practitioners in the energy storage or solar industry may have.
Crystalline silicon solar cells, made from layers of silicon, phosphorus, and boron, are commonly used in solar panels. These cells are arranged in a grid pattern, and a single solar panel is composed of multiple cells. The solar cells are responsible for converting sunlight into electricity.
The solar panel is enclosed in a protective frame, with a non-reflective glass cover that shields the cells from damage while allowing sunlight to pass through. The back of the panel is also sealed to provide additional protection.
What are Watts in Solar Panels?
Solar panels are rated in terms of watts, which represents their power generation capacity. A 100-watt solar panel, under ideal conditions, can generate 100 watts of direct current (DC) power. The actual output may vary depending on various factors.
To determine the amps produced by a 100-watt solar panel, we can divide the wattage by the maximum voltage output. For example, a typical 100-watt solar panel with a maximum voltage output of 18 volts would produce approximately 5.5 amps.
Calculating Amps:
To calculate the amps produced by a solar panel, divide the total wattage output by the panel’s maximum voltage (Vmp). This will give you the current output in amps.
Factors Affecting Solar Panel Ratings:
When comparing solar panels, it’s important to consider factors beyond wattage. Solar panel efficiency, durability, warranties, and cost are all important aspects to consider. High-efficiency panels can generate more power using less space, while warranties provide assurance of long-term performance.
Efficiency:
Solar panel efficiency refers to the percentage of sunlight that is converted into electricity. The majority of solar panels on the market have efficiency ratings between 14% and 23%. Higher efficiency panels can generate more power in limited space.
Wattage:
Wattage represents the power output of a solar panel under ideal conditions. It is calculated by multiplying the amps by the volts. Solar panels for home and commercial use typically have wattages in the 300s or low 400s.
Understanding Amps in Solar Panels:
Amps, volts, and watts are interrelated units of measurement in solar panels. Amps measure the rate of electrical current flow, volts measure the force or pressure that causes electrons to flow, and watts represent the power output.
Why Calculating Amps is Important:
Understanding the amps produced by solar panels is crucial for estimating the power requirements of devices. By knowing the amps, volts, watts, or amp-hours required by an appliance, you can determine the size and quantity of solar panels needed for optimal performance.
How Many Batteries Can a 100-Watt Solar Panel Charge?
The number of batteries a 100-watt solar panel can charge depends on the battery capacity and the energy needs of the system. For example, a single 100-watt solar panel can effectively charge a 12V battery with a capacity of 100Ah. If you require more energy storage, you may need additional batteries or a more powerful battery.
Types of Batteries:
Deep-cycle batteries, such as lead-acid and lithium-ion batteries, are commonly used in solar systems. Lead-acid batteries are more affordable but should not be discharged below 50% capacity for optimal performance. Lithium-ion batteries, although more expensive, offer greater longevity and energy storage capacity.
Can a 100-Watt Solar Panel Power a TV?
A 100-watt solar panel can power a TV, but the size and type of TV must be considered. LED TVs, which are energy-efficient, can be powered by a 100-watt solar panel up to 40 inches in size. However, larger TVs or those with higher power requirements may require more powerful solar panels.
FAQs
How many amps does a 100 watt solar panel produce?
A 100 watt solar panel can produce up to 8.33 amps of current in ideal conditions. The amperage output is calculated using the formula Amps = Watts / Volts. However, in realistic conditions, the amp output may vary. At 90% efficiency, the amp output can be around 7.50 amps. It’s important to consider factors like temperature, cloud cover, and panel efficiency when estimating the amp output of a 100 watt solar panel.
Ideal Conditions: A 100 watt solar panel can produce up to 8.33 amps of current in ideal conditions, calculated using the formula Amps = Watts / Volts.
Realistic Conditions: In realistic conditions, the amp output may vary due to factors like temperature, cloud cover, and panel efficiency. At 90% efficiency, the amp output can be around 7.50 amps.
Factors to Consider: When estimating the amp output of a 100 watt solar panel, it’s important to consider factors like temperature, cloud cover, and the efficiency of the panel.
What is the actual output of a 100 watt solar panel?
The actual output of a 100 watt solar panel can vary based on factors like location, shading, weather conditions, and time of year. In real-world testing, a 100 watt solar panel produced an average of 431 watt hours per day. However, the energy production can range between 300 to 500 watt hours per day. It’s important to consider these factors when estimating the actual output of a 100 watt solar panel.
Real-World Testing: A 100 watt solar panel was tested over a 10-day period, producing an average of 431 watt hours per day.
Energy Production Range: The actual output of a 100 watt solar panel can vary between 300 to 500 watt hours per day, depending on factors like location, shading, weather conditions, and time of year.
Factors Influencing Output: Location, shading, weather conditions, and time of year play a significant role in determining the energy production of a 100 watt solar panel.
How many amp hours can I get from a 100 watt solar panel?
A 100 watt solar panel can generate a maximum of 8.3 amps of current assuming 100% efficiency. However, the actual amp hours obtained from a 100 watt solar panel can vary based on sunlight exposure, solar cell count, and solar panel efficiency. Factors like shade or cloud cover, orientation or inclination, and seasons with less sunlight can affect the output. To optimize the efficiency of a 100 watt solar panel, it’s recommended to clean the panels, maintain airflow, monitor the solar system, use solar batteries, and place the panels under direct sunlight.
Maximum Amp Output: A 100 watt solar panel can generate a maximum of 8.3 amps of current assuming 100% efficiency.
Factors Influencing Amp Hours: Sunlight exposure, solar cell count, and solar panel efficiency can impact the actual amp hours obtained from a 100 watt solar panel.
Optimizing Efficiency: To maximize the efficiency of a 100 watt solar panel, it’s recommended to clean the panels, maintain airflow, monitor the solar system, use solar batteries, and place the panels under direct sunlight.
How many 12V batteries can a 100W solar panel charge?
A 100W solar panel can charge a 35Ah 12V battery in 5-6 hours, assuming sufficient sunlight availability. However, the charging capacity of a 100W solar panel can vary based on factors like sunlight availability, battery depth of discharge (DoD) rate, and the type of battery used. To calculate the battery charge capacity, you can use the formula: Sun hours x 100W / Battery volt = Battery charge capacity. Optimizing battery charging involves considering sunlight availability, battery DoD rate, and choosing the appropriate battery type.
Real-World Testing: A 100W solar panel can charge a 35Ah 12V battery in 5-6 hours, assuming sufficient sunlight availability.
Factors Influencing Charging Capacity: Sunlight availability, battery depth of discharge (DoD) rate, and the type of battery used can impact the charging capacity of a 100W solar panel.
Optimizing Battery Charging: Consider sunlight availability, battery DoD rate, and choose the appropriate battery type to maximize the charging capacity of a 100W solar panel.
Power outages can be a significant inconvenience, whether occurring during the sweltering heat of summer or the freezing cold of winter. Understanding who to call and how to report a power outage can expedite the restoration process, minimizing disruption. This comprehensive guide will help you navigate the steps to report a power outage effectively and ensure your power is restored as quickly as possible.
Understanding Power Outages
Power outages can occur for various reasons, including severe weather conditions, accidents, and issues within the energy grid. Identifying the cause of an outage can help in reporting it accurately. Common causes include:
Weather-Related Issues: Storms, hurricanes, and heavy snowfall can damage power lines and equipment.
Accidents: Vehicle collisions with power poles or construction accidents can disrupt power supply.
High Demand: Excessive usage during peak times can overload the grid.
Equipment Failure: Aging infrastructure or technical faults can lead to outages.
Steps to Take During a Power Outage
1. Check for Localized Issues
Before reporting an outage, determine if the issue is within your household or neighborhood. Check your circuit breakers or fuse box to ensure the problem isn’t a tripped breaker or blown fuse. If neighbors are also experiencing an outage, it’s likely a wider issue.
2. Gather Necessary Information
Prepare to report the outage by gathering relevant information:
Your Address: Ensure you have your full address ready, including any specific details that can help locate your home.
Account Number: Having your utility account number can expedite the process.
Details of the Outage: Note when the outage began and any unusual occurrences (e.g., sparks, loud noises).
3. Contact Your Utility Company
The utility company is responsible for maintaining and repairing power lines and infrastructure. Report the outage to them promptly:
4. Use Online Reporting Tools
Many utility companies offer online outage reporting tools or mobile apps. These platforms can be more efficient than phone calls, especially during widespread outages when call volumes are high.
5. Monitor Updates
After reporting the outage, stay informed about the status and estimated restoration times. Utility companies often provide real-time updates via their websites, apps, or social media channels.
Preparing for Future Power Outages
Create an Emergency Kit
Having an emergency kit can make power outages more manageable. Include items such as:
Flashlights and batteries
Non-perishable food and water
First aid supplies
Portable phone chargers
Blankets and warm clothing
Install a Backup Power Source
Consider investing in a backup power source like a generator or uninterruptible power supply (UPS) for essential electronics and appliances.
Surge Protection
Protect your electronic devices from power surges by using surge protectors. Power surges can occur when electricity is restored.
Conclusion
Promptly reporting a power outage can significantly reduce the downtime and help utility companies restore power more efficiently. By following the outlined steps, preparing for future outages, and utilizing available resources, you can ensure a swift response and minimize the impact of power disruptions. Stay informed and proactive to keep your household safe and comfortable during power outages.
FAQs
How do you explain a power outage?
A power outage is the loss of electrical power supply to an end user. It can occur due to various reasons, such as faults at power stations, damage to transmission lines or substations, short circuits, cascading failures, or the operation of fuses or circuit breakers. Power outages disrupt the supply of electricity, leading to a loss of power in homes, businesses, and other facilities.
How do you explain power failure?
Power failure is the loss of electricity to a computer, peripherals, or other electronic devices. During a power failure, any data stored in temporary storage, such as the computer’s memory, is immediately lost and unrecoverable. Power failures can also cause data corruption and, in some cases, hardware damage. Common causes of power failures include power surges, electrical storms, brownouts, damaged power outlets, maintenance work by the power company, and excessive power usage.
How long do most power outages last?
The duration of power outages varies depending on the severity of the situation. In most normal situations, power outages last for a few hours as utility providers work to assess the cause, identify faults, and restore power. However, in cases of high severity, such as natural calamities or major faults, power outages can last for a few days. During these extended outages, utility companies require additional time to assess damage, coordinate repairs, and ensure worker safety.
How long can a fridge go without power?
A fridge without power can maintain safe temperatures for a limited time. If the doors of the refrigerator and freezer are kept closed, food will remain safe for up to 4 hours in the refrigerator. A full freezer can keep food cold for approximately 48 hours, while a half-full freezer can keep food cold for about 24 hours. However, it’s important to consider factors like ambient temperature and insulation quality for accurate food safety assessment during power outages.
Who do I call if my electricity goes off UK?
In the UK, if you experience an electricity outage or an electrical emergency, call 105 to report the issue. This free helpline connects you to your local electricity network operator who can assist you. Remember to check your fuse box, switch off appliances that shouldn’t be left unattended, and leave a light on to indicate when the power outage has been resolved.
Inverters are vital for converting DC to AC in solar and renewable energy systems. Running inverters in parallel is indeed possible. This article explores the process, steps, and benefits of parallel inverter operation. Additionally, it provides concise answers to the top 10 questions from energy storage and solar industry professionals.
The Benefits of Running Inverters in Parallel
Running inverters in parallel boosts power capacity by combining outputs of multiple inverters, catering to higher energy demands without overloading. It enhances reliability as if one fails, others continue supplying power. Also, it allows easy expansion, accommodating future energy needs. This setup ensures efficient and uninterrupted electricity supply, offering flexibility and scalability for growing power requirements.
Running inverters in parallel offers a range of advantages that can enhance your power system. Parallel operation increases the overall power capacity by combining the output of multiple inverters. This means you can meet higher energy demands without overloading a single unit.
Additionally, running inverters in parallel can improve system reliability and redundancy. If one inverter fails, the others can continue to supply power, reducing downtime and ensuring uninterrupted electricity supply.
Furthermore, parallel operation allows for scalability and flexibility in expanding your power system as needed. You have the freedom to add more inverters as your energy requirements grow, providing a cost-effective solution for future expansion needs.
Embracing parallel operation with your inverters opens up a world of possibilities for increased efficiency and reliability in your electrical setup.
Can You Run Inverters in Parallel?
Yes, you can connect inverters in parallel to boost power, but it’s important to do it right. Check that both inverters have similar specs, like voltage and current ratings. Follow the manufacturer’s instructions carefully for setup, ensuring proper syncing and load distribution. Always prioritize safety and seek professional advice if unsure.
Can You Run 2 Inverters Together?
Yes, you can run two inverters together to increase power output, but it’s essential to follow specific steps. Ensure both inverters have matching current ratings and are from the same manufacturer or have identical voltage and amperage ratings. Check voltage and frequency compatibility, use a parallel connection kit if available, synchronize the inverters, distribute the load evenly, and consult the manufacturer’s guidelines for safety.
When connecting two inverters in parallel, it’s crucial to match their voltage and frequency ratings. For example, let’s consider two inverters with the following specifications:
Inverter 1:
Voltage: 120V
Frequency: 60Hz
Inverter 2:
Voltage: 120V
Frequency: 60Hz
To connect these inverters in parallel, follow these steps:
Voltage Match: Ensure that both inverters have the same output voltage. In this case, both Inverter 1 and Inverter 2 have an output voltage of 120V, meeting this requirement.
Frequency Match: Verify that the frequency output of both inverters is identical. Here, both Inverter 1 and Inverter 2 have an output frequency of 60Hz, satisfying the condition.
Parallel Connection Kit: Some inverters come with parallel connection kits provided by the manufacturer. If such kits are available, use them as they facilitate proper synchronization and prevent any potential issues.
Synchronization: If a parallel kit is not available, ensure that the inverters are synchronized. This involves matching the phase and frequency of the output of both inverters. Failure to synchronize the inverters can result in power imbalances and potential damage to connected devices.
Load Sharing: Confirm that the connected load is distributed evenly between the two inverters. This helps prevent overloading of one inverter while the other remains underutilized.
Always consult the user manual or guidelines provided by the inverter manufacturer for specific instructions on parallel operation. They may provide additional details or precautions specific to your equipment.
Remember that connecting inverters in parallel can increase the overall power capacity and enhance system reliability, but it’s crucial to do so following the manufacturer’s guidelines to avoid any potential issues or damage to the equipment.
How to Run Inverters in Parallel:
Before connecting inverters in parallel, ensure they’re compatible by checking with the manufacturer. Use dedicated wires to connect the input terminals of the first inverter to the power source. Then, link the second inverter to the first one, connecting positive and negative outputs. Finally, plug the first inverter into the breaker panel using a compatible extension cord.
1. Consult the Manufacturer: Before connecting two inverters, it’s crucial to check with the manufacturer to ensure compatibility. Not all inverters support parallel operation, so it’s essential to use fully compatible ones to avoid any negative consequences.
2. Connect the Inverters: Start by connecting the input terminals of the first inverter to the battery bank or power source. Use dedicated wires specified by the manufacturer and keep the wire length under 6 feet to minimize power loss. Ensure the wires can handle the higher voltage and choose the appropriate wire size for optimal performance.
3. Link the Primary and Secondary Inverters: Connect the cables from the second inverter to the first one, linking the positive and negative outputs. Use alligator clips, a connection block, or wire for this purpose.
4. Plug in the Adapter: Attach a longer cord to the first inverter and connect it to the breaker panel. Make sure the voltage and amperage of your system are compatible with the extension cord. Take precautions to handle the increased amperage and power consumption.
Connect 2 inverters by ensuring they match in voltage and amperage. Link them to a battery with the same voltage, connecting positive and negative outputs. Use a breaker or extension cable with matching wattage and add circuit breakers for safety. Follow these steps for a reliable connection.
1. Acquire Appropriate Inverters: Obtain a second inverter that is identical to the first one in terms of voltage and amperage ratings. This ensures system-wide reliability and compatibility.
2. Link to a Power Supply Battery: Connect both inverters to a battery bank or a DC power source with the same voltage. Ensure that the combined power of the inverters does not exceed the capacity of the battery or power supply.
3. Link the Two Inverters Together: Connect the positive outputs of both inverters and the negative outputs using alligator clips, a connection block, or wire. Pay attention to proper polarity.
4. Connect to an Extension Cable or Breaker: Use an extension cable or a circuit breaker with a wattage rating matching the inverters’ combined output. Ensure the cable can handle the current without overheating.
5. Install Electrical Circuit Breakers: If necessary, install circuit breakers in your breaker box to protect the inverter system. Follow proper electrical wiring and installation practices or consult an expert.
Things to Consider Before Running Inverters in Parallel
Before connecting inverters in parallel, ensure they’re compatible and have matching power capacities. Secure wiring and connections are essential to prevent electrical hazards. Understand each inverter’s specifications and consult manufacturer guidelines. Distribute the load evenly, sync the inverters, and monitor regularly for safe and efficient operation
Before diving into running inverters in parallel, there are several important factors to consider. Check if the inverters are compatible for parallel operation – mixing incompatible models can lead to malfunctions. It’s crucial to ensure that the total power capacity of the parallel inverters meets your energy requirements without overloading them.
Additionally, confirm that all grounding and wiring connections are securely in place to avoid any electrical hazards. Understanding the technical specifications and limitations of each inverter is key to maintaining efficiency and preventing damage during parallel operation.
Consider consulting with a professional or referring to manufacturer guidelines for specific instructions tailored to your inverters. Assess whether running inverters in parallel aligns with your long-term energy goals and budget constraints before proceeding with installation.
Safety Precautions when Running Inverters in Parallel
When running inverters in parallel, safety is vital. Follow the manufacturer’s instructions closely, secure all connections, and avoid overloading. Regularly check for wear or damage, and address any issues promptly. Safety is paramount when working with electricity, so take precautions to ensure a smooth and safe operation.
Make sure to carefully read the manufacturer’s instructions and guidelines for running inverters in parallel. This will help you understand the specific requirements and limitations of your equipment.
Ensure that all connections are secure and properly insulated to prevent any electrical hazards. Loose connections can lead to overheating or even fires, so double-check everything before powering up the system.
Never overload your inverters by connecting too many devices at once. Exceeding the maximum capacity can not only damage your equipment but also pose a serious safety risk.
Regularly inspect your inverters for any signs of wear or damage. If you notice anything unusual, such as frayed wires or burnt components, immediately turn off the system and address the issue before resuming operation.
Remember, when it comes to working with electricity, taking precautions is key to ensuring a safe and successful experience.
FAQs about inverters in parallel
1. Can I connect different brands of inverters in parallel?
– No. It is recommended to use inverters from the same manufacturer or those with compatible specifications to ensure proper functionality and avoid damage.
2. What is the advantage of running inverters in parallel?
– Running inverters in parallel allows for increased power output and the ability to handle larger loads, making it suitable for demanding applications.
3. Are there any safety concerns when running inverters in parallel?
– Yes. Safety concerns include proper wiring, using compatible inverters, and ensuring the system can handle the increased amperage. Consult the manufacturer and follow guidelines to minimize risks.
4. Can I run inverters in parallel with different power ratings?
– No. It is not advisable to connect inverters with different power ratings in parallel as it can lead to unbalanced power distribution and potential damage to the inverters.
5. Can I parallel connect more than two inverters?
– Yes, it is possible to connect more than two inverters in parallel, but proper consideration of compatibility, load-sharing capacity, and waveform synchronization is essential.
6. How do I calculate the total power output when running inverters in parallel?
– Add the wattages of each individual inverter to determine the total power output. Ensure that the combined power output exceeds the wattage requirement of the load you intend to power.
7. Are there any limitations to running inverters in parallel?
– Yes. Running inverters in parallel increases power output but also increases power consumption. Consider the capacity of your power source and ensure it can handle the increased load.
8. Can I connect inverters in parallel for off-grid solar systems?
– Yes. Parallel connection of inverters is common in off-grid solar systems to increase power output and meet the energy demands of off-grid living.
9. What happens if one of the inverters in a parallel connection fails?
– In the event of a failure in one of the inverters, the other inverters in parallel will continue to operate, providing power to the load. However, it’s essential to address the faulty inverter to maintain the overall system’s efficiency.
10. Can I connect inverters in series instead of parallel?
– No. Inverters can be connected in series, but it is less common and may require additional considerations. Series connection increases voltage while maintaining the same current. It is typically used in specific applications where high voltage is required.
11. Why are inverters connected in parallel?
– Inverters are linked in parallel to elevate system power capacity. This configuration enhances reliability and provides a backup, ensuring continuous power supply even if one inverter experiences issues.
12. What are the advantages of a parallel inverter?
– Parallel inverters offer heightened power output, increased efficiency, and redundancy. For example, connecting two inverters with a combined capacity of 4kVA provides a power capacity of 8kVA in parallel. This redundancy ensures uninterrupted power supply and flexibility in load management.
13. How are inverters in parallel different from series?
– In parallel, inverters share the load, amplifying overall capacity. For instance, connecting two 3kVA inverters in parallel results in a combined capacity of 6kVA. In series, inverters increase voltage but not capacity. Understanding this difference is crucial for designing systems with specific power requirements.
Conclusion:
Running inverters in parallel offers increased power output and improved load handling capabilities. By following the manufacturer’s guidelines and considering compatibility, practitioners in the energy storage and solar industry can harness the benefits of parallel connection. It’s crucial to prioritize safety, proper wiring, and system capacity to ensure optimal performance and longevity of the inverters.
Power outages can occur for various reasons, both natural and artificial, such as storms, equipment failures, and high or low voltage. These outages are often referred to as brownouts, blackouts, or power interruptions. In this article, we will explore the distinctions between these terms and provide a comprehensive understanding of each.
Brownout:
A brownout is a temporary decrease in voltage levels within an electrical grid. It typically occurs when there is an overload on the power grid or a high demand for electricity. Factors such as circuitry faults or lightning strikes can also contribute to brownouts. During a brownout, the electrical system conserves power by reducing the voltage level, resulting in dimmed lighting and reduced performance of electronic equipment. While some devices may still function, the fluctuation in voltage can potentially cause damage. It’s important to note that brownouts can be intentionally initiated by electric companies as a measure to prevent complete blackouts.
Blackout:
In contrast, a blackout refers to a complete loss of power in an electrical grid, affecting an entire area or city. Blackouts can last for hours, days, or even weeks, and they are caused by a variety of factors including equipment failures, natural disasters, and human negligence. During a blackout, all electronically operated appliances, such as lights, refrigerators, televisions, and computers, lose access to electricity. This sudden and unexpected loss of power can result in significant commercial losses and disruptions.
Power Interruptions:
Power interruptions are temporary and localized power outages that affect specific areas within a region. These interruptions occur suddenly and typically last for only a minute or two. Common causes of power interruptions include tripped circuit breakers and accidents near power lines or utility poles. Power interruption incidents are managed and resolved quickly by power station workers to ensure a reliable power supply for customers.
Differences between Brownouts and Blackouts:
There are several distinctions between brownouts and blackouts:
1. Cause: Brownouts are primarily caused by high electricity demand, while blackouts can occur due to various factors such as equipment failures, natural disasters, and human errors.
2. Duration: Brownouts typically last for a few hours or minutes, whereas blackouts can persist for extended periods, ranging from hours to days or even weeks.
3. Voltage Levels: During a brownout, the voltage levels fluctuate, causing devices to operate at lower or inconsistent power levels. In contrast, during a blackout, there is a complete loss of power, rendering electronic devices inoperable.
4. Damage Risk: Brownouts pose a higher risk of damaging electronic equipment due to the fluctuation in voltage levels. In contrast, blackouts do not pose a direct risk of damage as there is no power supply.
5. Intentionality: Brownouts can be intentionally initiated by electric companies as a means to manage power demand, whereas blackouts are typically unintentional and unexpected.
Brownouts vs. Blackouts: Are They the Same?
No, brownouts and blackouts are not the same. While both terms refer to temporary power outages, brownouts involve a decrease in voltage levels, while blackouts result in a complete loss of power. Brownouts are often intentional and can be managed, whereas blackouts are typically unplanned and may cause significant disruptions and losses.
Are Brownouts Worse than Blackouts?
In terms of potential damage to electronic equipment, brownouts are generally considered worse than blackouts. The fluctuation in voltage levels during a brownout can lead to electrical appliances being burned out or damaged. In a blackout, however, there is no voltage issue, and electronic devices are simply without power. It is advisable to refrain from using electronic equipment during brownouts and to turn off and unplug devices to prevent damage.
Top 10 Questions and Answers for Practitioners in the Energy Storage or Solar Industry:
1. How can energy storage systems help mitigate the impact of brownouts and blackouts?
2. What are the most common causes of blackouts and how can they be prevented?
3. How does the integration of renewable energy sources, such as solar power, affect the occurrence of brownouts and blackouts?
4. What role does battery storage play in ensuring a reliable power supply during power interruptions?
5. How can advanced monitoring and control systems assist in identifying and resolving power outages more efficiently?
6. Are there specific regulations or standards in place for maintaining grid stability and preventing brownouts and blackouts?
7. What are the economic implications of power interruptions on businesses and households?
8. How can microgrids contribute to reducing the impact of blackouts on critical infrastructure?
9. Are there incentives or programs available to promote the adoption of energy storage systems for resilience against power outages?
10. How can the combination of energy storage and renewable energy technologies help create a more resilient and sustainable power grid?
Remember, when facing a power outage, whether it’s a brownout, blackout, or power interruption, being prepared with backup power sources or having a plan in place can help mitigate the inconvenience and potential losses.
Solar powered calculators are becoming increasingly popular as people look for sustainable options in their daily lives. These calculators utilize light energy from the sun to power their operations, making them both eco-friendly and convenient. With a wide range of options available in the market, it can be challenging to choose the best solar powered calculator for your needs. To help you make an informed decision, we have researched and compiled a list of the top 5 solar powered calculators.
Google Project Sunroof:
Google Project Sunroof stands out as one of the best solar powered calculators available. It utilizes data from Google Maps to provide users with valuable information about the feasibility of installing solar panels on their roofs. By simply entering your address, Project Sunroof generates a detailed report that includes the amount of sunlight your roof receives throughout the year and potential cost savings from going solar. This calculator is highly recommended for anyone considering solar panel installation.
Helect Standard Function Solar Desk Calculator:
The Helect Standard Function Solar Desk Calculator is an excellent choice for everyday calculations. Its large display ensures easy readability, and the buttons are clearly labeled for user convenience. This calculator boasts a durable construction that can withstand frequent use, making it ideal for both professional and personal settings.
For those who are always on the go, the Casio Basic Folding Compact Solar-Powered Calculator is a perfect option. Its compact design allows for easy portability, fitting comfortably in pockets or bags. Despite its small size, it features large keys and an 8-digit display, ensuring easy input and viewing. The calculator’s solar power capabilities eliminate the need for frequent battery changes, making it a practical choice for both work and study purposes.
EastPin Basic Solar Power Calculator:
The EastPin Basic Solar Power Calculator is a valuable tool for real-time power output calculations. Its built-in solar panel makes it self-sufficient and sustainable, while a backup battery ensures functionality even in low-light conditions. This compact calculator with an easy-to-read display is perfect for quick calculations on the go. It is an excellent choice for environmentally conscious individuals and businesses.
Casio MS-80b Standard Function Solar-Powered Desktop Calculator:
If you’re tired of constantly replacing calculator batteries, the Casio MS-80b Standard Function Solar-Powered Desktop Calculator is the solution. With its sleek silver-metallic finish and solar panel, it is perfect for offices and classrooms. The calculator’s standard size and soft keys ensure accuracy and efficiency while calculating. Its bright multi-line display allows for tracking long equations and checking for errors. Additionally, the built-in tax calculation function adds convenience when dealing with finances.
Benefits of Solar Powered Calculators:
Solar powered calculators offer numerous benefits:
1. Energy Efficiency: Solar powered calculators help save energy and reduce carbon footprints by utilizing renewable solar energy.
2. Convenience: With solar powered calculators, you never have to worry about batteries dying or running out of power. They are always ready to use.
3. Durability: These calculators have a long lifespan due to their lack of moving parts, making them resistant to wear and tear.
4. Affordability: Solar powered calculators are cost-effective as they do not require special batteries or charging equipment.
5. Support for Renewable Energy: By using solar powered calculators, you contribute to reducing dependence on fossil fuels and supporting the growth of renewable energy sources.
How Much Power Do Solar Powered Calculators Need?
Solar powered calculators require very little energy. They typically consume between 0.02 and 0.03 watts of electricity, similar to the energy required for a night light. This low energy requirement makes solar powered calculators an excellent eco-friendly choice for everyday use. Their small solar panels enable them to charge even in indoor lighting conditions, adding to their convenience.
How to Choose the Best Solar Powered Calculator?
When selecting the best solar powered calculator, consider the following factors:
1. Solar Panel Size: Larger solar panels generate more power.
2. Battery Type: Choose between calculators with replaceable batteries or those with built-in batteries.
3. Calculator Size: Decide if you need a small and portable calculator or a larger one.
4. Features: Some calculators have additional features like data storage or connectivity to computers.
5. Price: Determine your budget before shopping for a solar powered calculator.
Top 10 Questions and Answers for Practitioners in the Energy Storage or Solar Industry:
2. Q: Are solar powered calculators reliable?
A: Yes, solar powered calculators are reliable as long as they receive sufficient sunlight to charge their batteries.
3. Q: Can solar powered calculators be used indoors?
A: Yes, solar powered calculators can still charge in indoor lighting conditions, although it may take longer than under direct sunlight.
4. Q: Are there any maintenance requirements for solar powered calculators?
A: Solar powered calculators typically require minimal maintenance. Keeping the solar panel clean and free from dust is essential for optimal performance.
5. Q: How long do the batteries in solar powered calculators last?
A: The lifespan of the batteries in solar powered calculators varies depending on usage. However, with proper care, they can last for several years.
6. Q: Can solar powered calculators be used at night?
A: Solar powered calculators primarily rely on sunlight for charging. They may not function in complete darkness unless they have a backup battery.
7. Q: Can solar powered calculators be used in areas with less sunlight?
A: Yes, solar powered calculators can still function in areas with less sunlight, although they may require longer exposure to charge fully.
8. Q: Are there any safety concerns with solar powered calculators?
A: Solar powered calculators are generally safe to use. However, it is important to follow the manufacturer‘s instructions and avoid exposing them to extreme temperatures.
9. Q: Can solar powered calculators be recycled?
A: Many solar powered calculators can be recycled. Check with local recycling facilities or electronic waste collection centers for proper disposal options.
10. Q: Are there any limitations to using solar powered calculators?
A: The primary limitation of solar powered calculators is their reliance on sunlight for charging. Insufficient sunlight may result in reduced functionality.
Are you tired of worrying about your fridge during power outages? Choosing the right inverter size can be the key to keeping your food fresh and your worries at bay. In this comprehensive guide, we’ll walk you through everything you need to know about selecting the perfect inverter for your fridge. Say goodbye to spoiled groceries and hello to reliable power backup – let’s dive in!
Understanding Inverters and Their Importance in Power Backup Systems
Inverters are the unsung heroes of power backup systems, quietly working behind the scenes to keep your appliances running smoothly during blackouts. These devices convert DC power from batteries into AC power that your fridge and other electronics can use. So, when the lights go out, your inverter steps up to bat, ensuring you don’t lose all those perishable goodies in your refrigerator.
The importance of choosing the right inverter size cannot be overstated – too small, and it won’t be able to handle the load; too large, and you might end up overspending on unnecessary capacity. Understanding how inverters function and their role in maintaining a reliable power supply is crucial for optimal performance.
When selecting an inverter for your fridge, consider factors like its efficiency rating, surge capacity, and waveform output. By grasping these key concepts, you’ll be better equipped to make an informed decision that meets both your energy needs and budget constraints.
Factors to Consider When Choosing the Right Inverter Size for Your Fridge
When selecting the right inverter size for your fridge, there are a few key factors to keep in mind. Consider the power consumption of your fridge. Look for the manufacturer‘s specifications on energy usage or use a power meter to measure it accurately.
Next, think about any additional appliances you may want to connect to the inverter along with your fridge. Ensure that the total wattage of all devices does not exceed the capacity of the inverter you choose.
Moreover, take into account the starting surge or peak power required by your fridge when it kicks on. This initial surge can be higher than its normal running wattage and should be factored into your calculations.
Consider future needs and potential expansions when deciding on an appropriate inverter size. It’s always better to have some extra capacity rather than risk overloading your system down the line.
Determining the Power Consumption of Your Fridge
When it comes to determining the power consumption of your fridge, it’s essential to start by checking the appliance’s energy label. This label typically provides information on the fridge’s annual energy consumption in kilowatt-hours (kWh).
Additionally, you can use a power meter to measure how much electricity your fridge consumes over a specific period. Simply plug the fridge into the power meter and let it run for a day or two to get an accurate reading.
Another method is to refer to the user manual of your refrigerator, as it often includes details on its power usage. If you don’t have access to this information, you can contact the manufacturer or check their website for specifications.
By understanding how much power your fridge uses, you’ll be able to calculate the appropriate size of an inverter needed for backup during outages effectively.
Calculating the Required Inverter Capacity
Calculating the required inverter capacity for your fridge is crucial to ensure uninterrupted power supply during outages. To determine the right size, start by checking the wattage rating on your fridge’s nameplate or manual. This information will give you an idea of how much power your appliance consumes when running.
Next, consider any additional power requirements like startup surge or compressor cycling which may need extra capacity from the inverter. Factor in inefficiencies and losses that might occur during power conversion.
Once you have these numbers, use a simple formula: Inverter Capacity = Fridge Wattage × 1.5 to safely accommodate fluctuations and unexpected demands. Remember, it’s better to have a slightly larger inverter than one that struggles to meet your fridge’s needs.
By accurately calculating the required inverter capacity for your fridge, you can rest assured knowing you’ve made a smart choice for seamless backup power solutions!
Popular Inverter Sizes for Fridges and Their Capabilities
When it comes to choosing the right inverter size for your fridge, it’s essential to understand the capabilities of different popular sizes available in the market. Inverters typically range from 600VA to 2000VA, with higher capacities offering more power backup.
A 600VA inverter is suitable for small fridges with minimal power consumption, perfect for compact living spaces or as a backup option during short outages. Moving up to a 1000VA inverter provides sufficient power for medium-sized fridges without overloading the system.
For larger refrigerators or if you have additional appliances connected to the same inverter, opting for a 1500VA or 2000VA model ensures reliable performance and efficient operation during extended power cuts. It’s important to match the inverter size with your fridge’s wattage requirements for optimal functionality and longevity.
Consider factors like compressor starting current and any potential future additions when selecting the appropriate capacity to meet your household needs effectively.
Tips for Maximizing Your Inverter’s Efficiency with Your Fridge
When it comes to maximizing your inverter’s efficiency with your fridge, there are a few tips that can help you make the most out of your power backup system. Consider investing in an energy-efficient fridge model to reduce the overall power consumption. This will not only benefit the environment but also help optimize your inverter usage.
Another tip is to keep your fridge well-maintained by regularly cleaning its coils and ensuring proper ventilation around the appliance. A well-functioning fridge will require less energy from your inverter to operate efficiently.
Additionally, organizing your fridge contents strategically can help minimize the time it needs to run, thus reducing strain on your inverter. By keeping similar items together and avoiding overloading the fridge, you can improve energy efficiency and prolong the lifespan of both your fridge and inverter.
Consider setting optimal temperature settings for your fridge based on manufacturer recommendations. Adjusting these settings appropriately can prevent unnecessary energy consumption while still keeping your food fresh and safe.
Conclusion
Choosing the right inverter size for your fridge is crucial to ensure a seamless power backup system. By understanding the power consumption of your fridge, calculating the required inverter capacity, and considering popular inverter sizes, you can make an informed decision.
Remember to factor in peak load requirements and consider future expansion when selecting an appropriate inverter size. Additionally, implementing tips like positioning your fridge efficiently and maintaining it regularly can help maximize your inverter’s efficiency.
By choosing the right inverter size for your fridge, you can enjoy uninterrupted cooling even during power outages. Make sure to assess your needs carefully and invest in a reliable solution that meets both your current and future requirements.
d decision.
To keep the interior of a refrigerator at a constant, cool temperature, the compressor cycles on and off at regular intervals. When it turns on, the refrigerator consumes a significant amount of electricity, with the power surge being three to ten times the continuous watts. Therefore, when considering what size inverter you need to run a fridge, it is important to choose one that can handle both the running power and the surge power.
A general rule of thumb is to select an inverter with a minimum rating of five times the electricity consumption of your refrigerator. For example, if your fridge requires 200W of power, an inverter providing 1000W/2000W (continuous/surge) should suffice. This ensures that the inverter can handle both the constant power required by the fridge and the initial surge power needed to start it.
Powering a fridge with an inverter means that even during a power outage, you can keep your food fresh and avoid any spoilage. Traditional refrigerators have a single-speed compressor that runs at full speed until the desired temperature is reached, whereas smart inverter refrigerators have variable-speed compressors. These compressors can adjust their rotation speed based on the power source available, making them compatible with household inverters.
The runtime of an inverter-backed refrigerator depends on the inverter’s capacity (VA – Volt Ampere) and the battery’s capacity (Ah – Ampere-hours). A smart inverter fridge typically requires at least 90W to function, so taking into account the power consumption of other appliances, the total power consumption during a power outage would be around 185W.
Now, let’s address some common questions practitioners in the energy storage or solar industry may have:
1. What is the minimum inverter size required to run a fridge?
The recommended minimum inverter rating is five times the electricity consumption of your fridge.
2. Can a 750-watt inverter run a refrigerator?
Yes, a 750W inverter can run a refrigerator. However, it is important to consider the surge or peak capacity of the inverter and ensure it is twice as high as the running wattage.
3. Will a 1000-watt inverter run a refrigerator?
Yes, a 1000W inverter can run a refrigerator, especially if it is a newer and more efficient model. It is essential to know the power consumption of your fridge and the rated surge capacity of the inverter.
4. Can a 1500-watt inverter run a refrigerator?
It is not recommended to operate your inverter at maximum capacity. A 1500W inverter can support a 1500W load, but it is important to consider factors such as inverter efficiency, battery size, and cable size.
5. Can a 2000-watt inverter run a refrigerator?
Yes, a 2000W inverter can run a refrigerator, as long as the total power usage of the fridge is less than 4000 watts. Energy-efficient refrigerators with a capacity of 21 to 24 cubic feet typically require 1200 to 1500 watts to operate.
6. Is it necessary to use a pure sine wave inverter for a refrigerator?
Yes, to power a refrigerator, a pure sine wave inverter is recommended. It ensures a smooth and stable flow of electricity, preventing any potential damage to the appliance.
7. What are the factors to consider when selecting the right inverter size for a fridge?
Some factors to consider include the power consumption of the refrigerator, the surge wattage required to start the fridge, the inverter’s efficiency rate, the type of inverter, the battery size, and the cable length.
8. Can multiple appliances be powered by the same inverter?
Yes, multiple appliances can be powered by the same inverter. However, it is important to calculate the total power consumption of all the appliances to ensure the inverter can handle the load.
9. How long can an inverter-backed refrigerator run on battery power?
The runtime of an inverter-backed refrigerator depends on the inverter’s capacity and the battery’s capacity. The exact duration will vary based on factors such as the inverter, the batteries, the user’s habits, and the specific refrigerator type.
10. Are there any energy-efficient refrigerators specifically designed for use with inverters?
Yes, there are energy-efficient refrigerators with smart inverter technology that can be powered by household inverters. These refrigerators have low power consumption, allowing them to keep food cool for extended periods during power outages.
Remember, choosing the right inverter size for your fridge is crucial to ensure uninterrupted operation during power outages. By considering factors such as power consumption, surge wattage, and inverter capacity, you can make an informed decision and keep your food fresh and safe.
Main Menu new
Menu
Manage Consent
To provide the best experiences, we use technologies like cookies to store and/or access device information. Consenting to these technologies will allow us to process data such as browsing behavior or unique IDs on this site. Not consenting or withdrawing consent, may adversely affect certain features and functions.
Functional
Always active
The technical storage or access is strictly necessary for the legitimate purpose of enabling the use of a specific service explicitly requested by the subscriber or user, or for the sole purpose of carrying out the transmission of a communication over an electronic communications network.
Preferences
The technical storage or access is necessary for the legitimate purpose of storing preferences that are not requested by the subscriber or user.
Statistics
The technical storage or access that is used exclusively for statistical purposes.The technical storage or access that is used exclusively for anonymous statistical purposes. Without a subpoena, voluntary compliance on the part of your Internet Service Provider, or additional records from a third party, information stored or retrieved for this purpose alone cannot usually be used to identify you.
Marketing
The technical storage or access is required to create user profiles to send advertising, or to track the user on a website or across several websites for similar marketing purposes.