Welcome to the world of renewable energy! As we all know, our planet is facing an unprecedented environmental crisis. But there’s hope – solar power has been gaining popularity as a reliable and sustainable source of energy. If you’re looking for a way to charge your Lifepo4 battery sustainably, then you’ve come to the right place! In this blog post, we’ll be discussing how to charge your Lifepo4 battery with solar power, its benefits, and how to install a solar charger. So sit back and read on – let’s harness the sun’s power together!
What is a Lifepo4 Battery?
Lifepo4 batteries are a type of rechargeable battery that use lithium iron phosphate as their cathode material. They are known for their high energy density, long lifespan and safety features. Unlike other types of batteries, Lifepo4 batteries have a much lower risk of catching fire or exploding.
One notable advantage of using Lifepo4 batteries is their ability to maintain a consistent voltage throughout the discharge cycle. This means that they can provide stable power output without experiencing the drop in performance often seen with other battery types.
Lifepo4 batteries also have an impressive lifespan when compared to traditional lead-acid batteries. With proper care and maintenance, they can last anywhere from 5-15 years – making them an excellent investment for those looking for a long-term power solution.
If you’re looking for a reliable and safe way to store your renewable energy, then consider investing in a Lifepo4 battery. Its durability and longevity make it one of the best options on the market today!
How to Charge a Lifepo4 Battery With Solar
Charging a Lifepo4 battery with solar power is an eco-friendly and cost-effective option. Here’s how to do it:
1. Choose the Right Solar Panel
The first step is to select a solar panel that matches the voltage of your Lifepo4 battery. A 12-volt battery requires a 12-volt panel, while a 24-volt one needs a 24-volt panel.
2. Use a Charge Controller
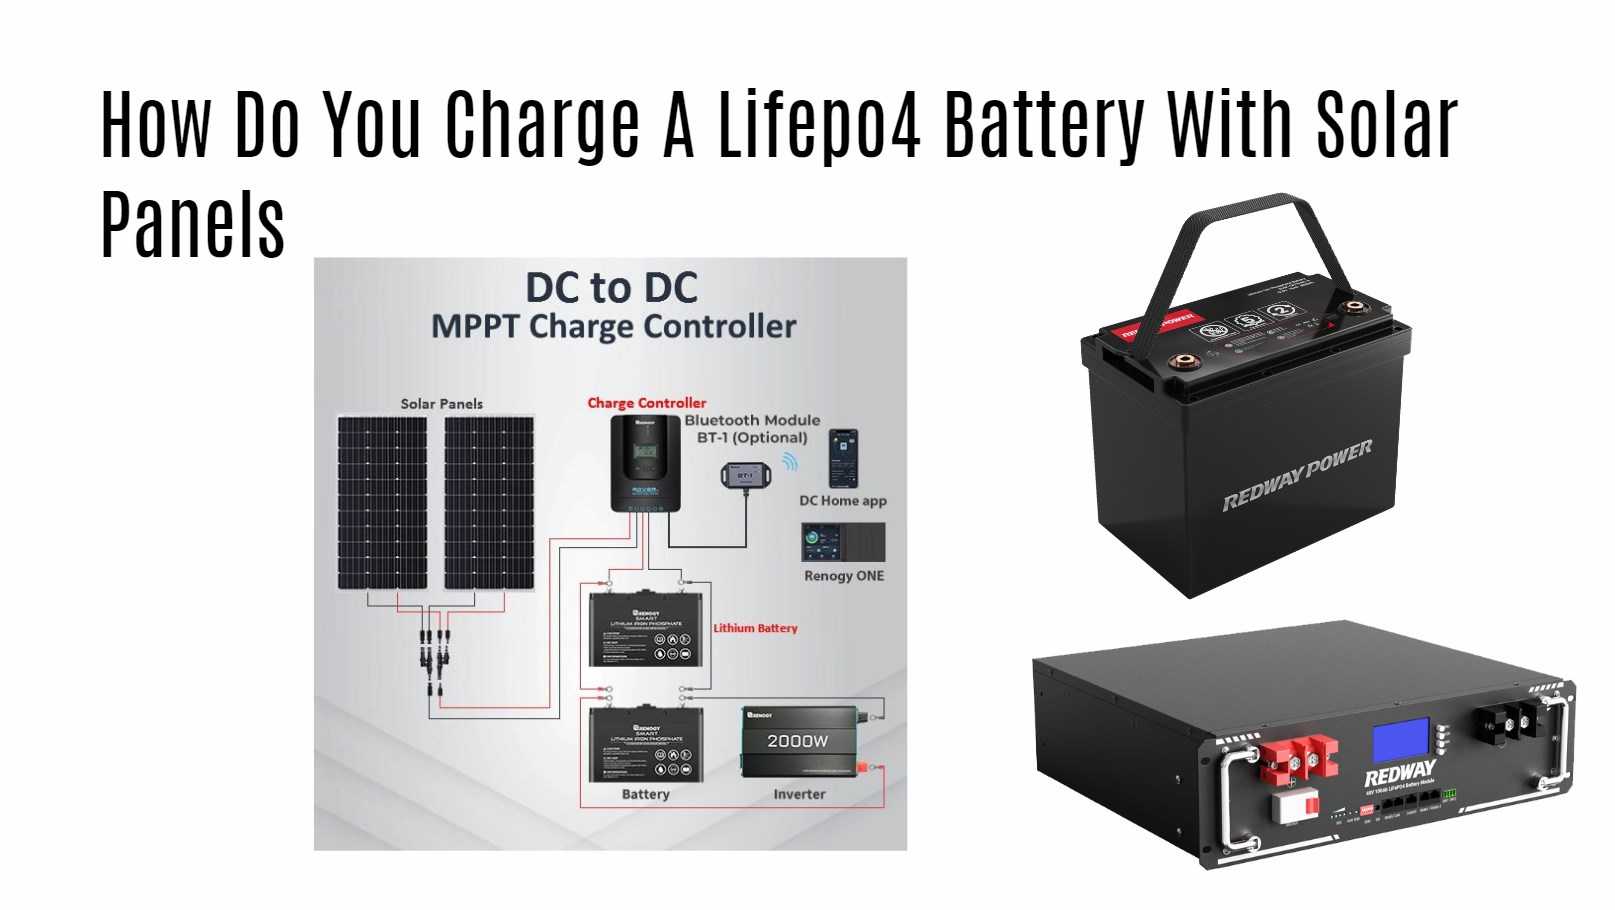
A charge controller regulates the amount of current flowing from the solar panel into the battery, preventing overcharging or discharge.
3. Connect Battery and Solar Panel
Connect your Lifepo4 battery to the charge controller using wires and connect it with solar panels too.
4. Monitor Charging Process
Once everything is connected, you can monitor the charging process using an inverter or voltmeter until your Lifepo4 reaches full capacity.
By following these steps, you can easily charge your Lifepo4 batteries with solar energy without any hassle!

The Benefits of Using Solar to Charge Your Lifepo4 Battery
Using solar power to charge your Lifepo4 battery can offer numerous benefits. Firstly, it is an eco-friendly option as it relies on renewable energy from the sun rather than relying on electricity generated by fossil fuels.
Secondly, using solar energy to charge your battery offers a cost-effective solution in the long run since you won’t need to pay for electricity bills or buy fuel for power generators.
In addition, charging your Lifepo4 battery with solar panels ensures that you have access to power even when there’s a blackout or during outdoor adventures where there’s limited access to electrical outlets.
Another benefit of using solar chargers is their portability and convenience. Solar chargers are lightweight and easy to carry around, making them ideal companions if you’re constantly on-the-go.
Using solar panels helps reduce carbon emissions which contribute significantly towards climate change. By switching over to clean energy sources such as solar power, we can all do our part in protecting the environment and preserving it for future generations.
Utilizing solar technology instead of traditional methods of powering devices offers significant advantages that make it worth considering as a reliable source of energy for charging batteries like the Lifepo4 type.
How to Install a Solar Charger for Your Lifepo4 Battery
Installing a solar charger for your Lifepo4 battery may seem like a daunting task, but it can actually be quite simple. The first step is to determine the location of where you want to install the solar panels. Ideally, this should be in an area that receives direct sunlight for most of the day.
Once you have determined the location, it’s time to mount your solar panels. This can be done on a roof or other elevated surface using brackets and screws. Be sure to follow all safety precautions when working at heights.
Next, you will need to connect your solar panels together using wiring and connectors provided with your kit. Ensure that there are no exposed wires and that everything is connected securely.
After connecting your solar panels together, you will need to connect them to a charge controller which regulates the amount of power being sent from the panels into your Lifepo4 battery. Follow manufacturer instructions carefully when making these connections.
Connect your Lifepo4 battery to the charge controller using appropriate wiring and connectors provided by your kit or purchased separately based on specifications provided by manufacturers of each component in use during installation process.
With these steps complete, you should now have a fully functioning solar charging system for powering up those important electronics wherever life takes us!
Conclusion
To sum up, charging your Lifepo4 battery with solar power is a sustainable and cost-effective way to ensure that you always have access to reliable energy. With the right equipment and installation, it’s easy to harness the power of the sun and use it to charge your batteries.
Not only does this method help reduce our carbon footprint, but it also saves money in the long run. By investing in a quality solar charger for your Lifepo4 battery, you’ll be able to enjoy all its benefits for years to come.
So why not make the switch today? Start exploring different solar chargers available on the market and find one that best suits your needs. Trust us; you won’t regret it!


